• Gather all materials before starting
  • Prepare your workspace for a mess
  • Mix epoxy resin carefully for best results
  • Add depth and movement with layering and blending
  • Incorporate realistic elements for a lifelike seascape
  • Seal and protect your artwork for longevity

The allure of the ocean has captivated artists for centuries, and now, with the advent of epoxy resin, you can encapsulate its mesmerizing beauty within your own home. Epoxy resin seascape pieces are not just art; they're a slice of the sea's soul, frozen in time. As we embark on this journey to create your own oceanic masterpiece, remember that patience and precision are your allies. Let's dive into the deep blue with a step-by-step guide that will leave you with a stunning piece of art as unique as the waves themselves.

Gathering Your Oceanic Arsenal

Before setting sail on this creative voyage, it's crucial to assemble all the necessary materials. Just like a skilled sailor prepares for a journey at sea, a resin artist must have all tools at the ready to ensure smooth sailing. You'll need high-quality epoxy resin, pigments to create that perfect ocean blue, mixing sticks, protective gear, and more. But don't let this list intimidate you; once you have everything in place, half the battle is won.

Seascape Artisan's Material Checklist

  • Epoxy resin🔮
  • Hardener💧
  • Mixing cups🥤
  • Stir sticks🍡
  • Protective gloves🧤
  • Weighing scale⚖️
  • Silicone mat or protective surface cover🔲
  • Base board or canvas🖼️
  • Pigments or dyes🎨
  • Heat gun or torch🔥
  • Toothpicks or needles for air bubble removal📍
  • Mold or frame (if needed)🖼
  • Sandpaper for finishing edges🪵
  • Dust mask or respirator😷
  • Safety glasses🥽
  • Isopropyl alcohol for cleaning🧴
  • Sealant or varnish (optional for finishing)
  • Decorative elements like sand, shells, or stones (optional)🐚
  • Tweezers for placement of small items🔍
  • Level to ensure even pouring📐
Congrats, you've gathered all the materials needed to create your mesmerizing epoxy resin seascape piece! Now, let the waves of creativity flow.

Preparing Your Workspace

Resin art is both science and magic, but one thing it certainly isn't is tidy. Preparing your workspace is as important as the creation process itself. Ensure that your area is well-ventilated and free from dust—any stray particles can become unwelcome islands in your miniature oceanic scene. Cover surfaces with plastic sheets or wax paper for easy cleanup because when dealing with resin, spills are part of the adventure.

Preparing Your Workspace for Epoxy Resin Seascape Art

well-ventilated art studio workspace
Select Your Space
Choose a well-ventilated area with a flat surface to work on. Ensure the space is free from dust and is at a comfortable working height. A garage with open doors or a room with windows and fans are ideal choices.
workspace covered with protective plastic sheet
Protect Surfaces
Cover your workspace with a plastic sheet or professional resin mat to protect it from spills. Use painter's tape to secure the edges if necessary. This step is crucial as cured resin is difficult to remove.
organized art materials on a workspace
Gather Materials
Organize all your materials such as epoxy resin, pigments, mixing sticks, measuring cups, and protective gear. Having everything within arm's reach will streamline your workflow and prevent any unnecessary interruptions.
artist wearing safety gear for resin art
Safety First
Wear protective gear including gloves, a respirator mask, and safety glasses. Resin can be hazardous, so ensure you're well-protected before beginning your project.
leveling a workspace for resin art
Ensure Level Ground
Use a level to ensure your workspace is completely flat. An uneven surface can cause the resin to pool to one side, resulting in an uneven finish to your oceanic art piece.
canvas prepared on a workspace for resin art
Prepare Your Canvas
Place your canvas or board onto the workspace. If using a canvas, ensure it's tightly stretched and secured to prevent sagging under the weight of the resin. You might need to reinforce it with cardboard or foam board from underneath.
separate mixing station for resin pigments
Mixing Station Setup
Set up a separate mixing station with all your pigments, mixing cups, and sticks. This will help prevent any cross-contamination and keep your primary workspace clean.
well-lit workspace with desk lamp for resin art
Lighting and Magnification
Ensure you have adequate lighting to spot any bubbles or imperfections in your resin. A desk lamp or overhead lighting can be very helpful. Additionally, consider having a magnifying glass handy for detailed work.

Mixing Epoxy Resin Like a Pro

Mixing epoxy resin correctly is critical to achieving a clear and bubble-free seascape. The process can be unforgiving; incorrect ratios or incomplete mixing can lead to sticky situations—literally. But fear not! With my guidance and some practice, you'll be mixing epoxy like it's second nature. Remember to follow the manufacturer's instructions closely for the best results and always mix thoroughly to ensure proper curing.

Laying Down Your Ocean Floor

The foundation of any good seascape is its ocean floor. This will set the tone for your entire piece—think sandy shores or mysterious depths. Using pigments or even real sand can add an authentic touch to your artwork. This layer doesn't just serve an aesthetic purpose; it also provides structure and depth to your piece before adding those captivating waves.

Epoxy Resin Ocean Floor Creation

You will need:

  • clear epoxy resin kitEpoxy resin
  • epoxy resin hardenerHardener
  • plastic mixing cups for resinMixing cups
  • wooden mixing sticksMixing sticks
  • nitrile protective glovesProtective gloves
  • digital weighing scaleWeighing scale
  • resin pigments for ocean effectPigments
  • wooden base for resin artBase piece (wood, canvas, etc.)
  • heat gun for resin bubblesHeat gun or torch
  • fine sand and rocks for resin artSand and small rocks
  • small seashells for craftSeashells
  • safety glassesProtective eyewear

Instructions

  1. Start by preparing your workspace with protective coverings.
  2. Wear protective gloves and eyewear before handling materials.
  3. Measure the epoxy resin and hardener using the weighing scale.
  4. Mix the resin and hardener in a cup according to the manufacturer's instructions.
  5. Add pigments to the mixture to achieve desired ocean colors.
  6. Pour the colored resin onto the base piece to create the ocean floor.
  7. Arrange sand, small rocks, and seashells on the resin to mimic the ocean floor.
  8. Use the heat gun or torch to remove any bubbles from the resin.
  9. Allow the resin to cure as per the manufacturer's recommended time.

Notes

Always work in a well-ventilated area when handling epoxy resin. The ratio of resin to hardener is crucial for the mixture to set properly, so follow the manufacturer's instructions closely. Customizing the ocean floor can be done with various pigments and inclusions like glitter or small fish figurines to enhance the underwater effect. Experiment with different techniques like swirling or layering to create depth in your ocean floor.

Now that we've covered some essential preparatory steps let’s talk about color selection and blending techniques that will bring life into our seascapes. The choice of colors plays an integral role in rendering realistic water hues—from tranquil turquoise shallows to deep sapphire abysses—and requires a discerning eye for detail.

When selecting pigments or dyes for your project, consider transparency and how colors will interact when layered over one another. For example, transparent blue over a sandy base can mimic shallow water while adding touches of white can create foam and waves.

Blending these colors seamlessly is where artistry truly comes into play; you’ll want gradients as smooth as calm sea surfaces and transitions as natural as tides ebbing and flowing.

Crafting Waves That Dance

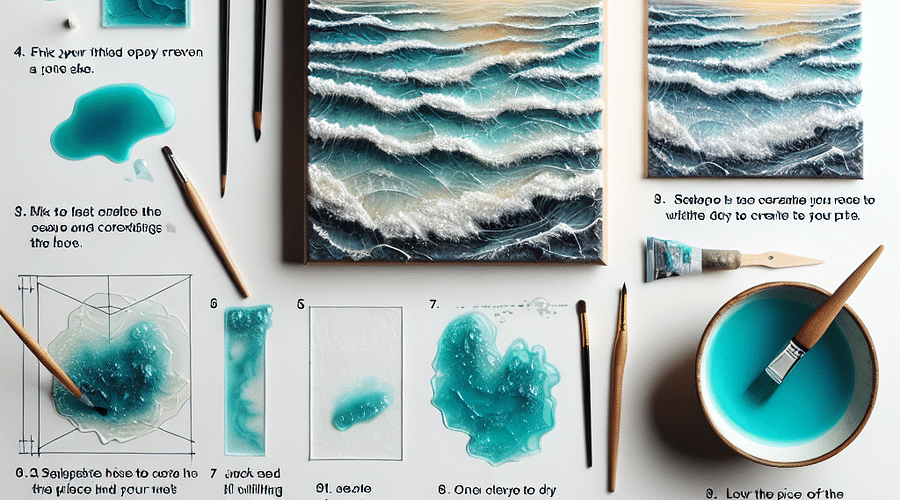
Perhaps nothing defines an oceanic scene quite like its waves—those rolling crests that catch light and shadow so uniquely. Crafting waves with epoxy resin may seem daunting at first glance but worry not: I’ll guide you through techniques that make wave-making more intuitive than ever before.

Wave Techniques

  1. layered epoxy resin art
    Layering - Build up the ocean depth by pouring thin layers of tinted resin, allowing each to cure before adding the next.
  2. resin color blending
    Color Blending - Use alcohol inks or resin dyes to create gradient hues that mimic the natural transition of sea colors.
  3. epoxy resin whitecap technique
    Whitecap Creation - Add realistic wave crests by drizzling white resin with a stick or by using a heat gun to form frothy peaks.
  4. texturing waves in resin
    Texturing - Employ tools like a silicone brush or comb to etch in wave patterns before the resin fully sets.
  5. tinted resin wash technique
    Tinted Washes - Apply a transparent wash of color over hardened resin to enhance depth and create shadow effects.
  6. resin heat manipulation
    Heat Manipulation - Use a blowtorch or heat gun to manipulate the resin flow, simulating the movement of water.
  7. embedding objects in epoxy resin
    Embedding - Incorporate sand, shells, or other materials into the resin to add texture and realism to the seabed.
  8. translucent epoxy resin layers
    Translucent Layers - Mix clear resin with a touch of color to create see-through layers that give the illusion of water depth.
  9. glossy resin surface finish
    Surface Effects - Add a glossy top coat to the finished piece to mimic the reflective surface of water.

As we conclude this first half of our guide on creating epoxy resin seascapes, remember that practice makes perfect—or rather perfectly unique in our world of creative crafts! Each step from preparation through execution serves as an integral part in bringing forth an artwork that resonates with the spirit of the sea itself.

If you're eager to continue expanding your knowledge about working with this versatile medium beyond seascapes alone or if you're curious about starting a business around epoxy resin artistry – feel free to explore our comprehensive guides tailored specifically towards budding artists like yourself!

Adding Depth and Movement to Your Seascape

One of the most captivating aspects of oceanic resin art is the illusion of depth and movement that mimics the sea. To achieve this, layering is your best friend. Start by pouring a thin layer of clear resin over your cured base color. Once this layer has set slightly, you can begin to introduce various shades of blue, green, and white to create gradients and the appearance of waves. Use a heat gun or a blowtorch to gently blend these colors, creating soft transitions that suggest water in motion.

For added realism, incorporate translucent pigments or inks. These can provide a glass-like finish that enhances the perception of water. Remember, patience is key; building up these layers slowly allows for more control over the final effect.

Incorporating Realistic Elements

To bring your seascape to life, consider adding three-dimensional elements such as sand, pebbles, shells, or even small pieces of driftwood. These natural materials can be partially embedded into one of the resin layers to create an authentic ocean floor texture. For an extra touch of creativity, use silicone molds to create miniature sea creatures or corals out of resin and place them within your piece.

Embedding Nature's Art

  1. assorted seashells
    Seashells - Carefully select a variety of seashells for size and color. Clean them thoroughly and let dry. Position them to mimic how they might naturally accumulate on a beach.
  2. fine beach sand texture
    Beach Sand - Use fine, clean sand to create a realistic shoreline. Sprinkle it gently onto the resin before it sets, creating gradients for a more authentic look.
  3. smooth pebbles
    Pebbles and Stones - Choose small, smooth pebbles to represent a pebbly beach or ocean floor. Wash them and place them carefully to avoid air bubbles.
  4. dried seaweed for crafts
    Dried Seaweed - Add a touch of marine life with dried seaweed. Ensure it's completely dry to prevent decay and arrange it to float or lay on the 'seabed' as desired.
  5. dried starfish
    Starfish - Incorporate dried starfish for a striking visual element. Make sure they are sustainably sourced and handle with care to maintain their shape.
  6. colored sea glass
    Sea Glass - Collect pieces of sea glass to add a touch of color and history. Place them where light can pass through to highlight their frosted translucence.
  7. small driftwood for crafts
    Driftwood - Small pieces of driftwood can create a sense of scale and ruggedness. Position them to suggest the motion of the tides.
  8. ethical coral fragments
    Coral Fragments - Use broken pieces of coral to add texture. Be sure to use only coral that has been ethically sourced to protect natural reefs.
  9. crushed shell fragments
    Shell Fragments - Smaller shell pieces can fill gaps and add detail. Crush them lightly if needed and sprinkle them to create a natural, layered effect.

When placing these elements into your seascape, think about how they would naturally interact with water. Positioning them at different depths can enhance the three-dimensional effect and make your artwork come alive with detail.

Finishing Touches: Sealing and Protecting Your Artwork

Your epoxy resin seascape is nearly complete! The final step is sealing and protecting your piece from UV rays and scratches. Apply a UV-resistant topcoat over the entire surface once all layers are fully cured. This not only protects but also adds a high-gloss finish that makes colors pop and gives an impressive sheen reminiscent of sunlight dancing on water.

Protecting Your Epoxy Resin Seascape: Sealants and Care

How do I seal my epoxy resin seascape to protect it?
Sealing your epoxy resin seascape is crucial for long-term protection. To seal your piece, you can apply a thin coat of a specialized resin sealant or varnish. Make sure the artwork is clean and free from dust. Apply the sealant with a soft brush or as directed by the product's instructions. Allow it to dry thoroughly before handling. This extra layer will help protect against UV rays, scratches, and dust.
🛡️
Can I use UV resin as a topcoat for my seascape art?
Absolutely! UV resin can be an excellent topcoat for your seascape art. It's known for its high-gloss finish and UV resistance, which can help prevent yellowing over time. Apply a thin, even layer over your cured epoxy resin piece and cure it under UV light as per the resin's instructions. This will give your seascape an additional layer of protection and enhance its vibrancy.
☀️
What's the best way to prevent dust from settling on my resin art during curing?
Dust can be a resin artist's nemesis! To prevent dust from settling on your resin art during curing, cover the piece with a dust-free cover, like a large box or a plastic dome. Make sure the cover doesn't touch the resin surface and that it's raised enough to allow proper air circulation. It's also helpful to work in a clean, low-traffic area to minimize airborne particles.
🛠️
Is it necessary to apply a UV protectant spray on resin art, even if it's displayed indoors?
While not always necessary, applying a UV protectant spray can be a good precaution to extend the life of your resin art, even indoors. Sunlight can still affect your art through windows, causing discoloration over time. A UV protectant spray adds an extra layer of defense against this slow fading process, ensuring your seascape remains as vibrant as the day you created it.
🏞️
How often should I reapply sealant to my epoxy resin seascape?
The frequency of reapplying sealant to your epoxy resin seascape depends on the piece's exposure to elements like sunlight and physical handling. For pieces that are kept indoors and not handled frequently, resealing every few years should suffice. However, for pieces that are in direct sunlight or are touched often, consider resealing annually to maintain optimal protection.
🗓️

Maintenance is straightforward but essential for preserving the beauty of your seascape over time. Clean it with a soft cloth and mild cleaner; avoid harsh chemicals that could damage the resin surface.

Inspired by the boundless beauty of the ocean, creating an epoxy resin seascape is both an artistic journey and a technical challenge. With each layer you pour, you'll find yourself more connected to the mesmerizing world beneath the waves—and better skilled in the craft of resin artistry.

Oceanic Art Inspirations

  1. epoxy resin crashing wave art
    Crashing Wave Majesty - A dynamic portrayal of a wave's power, encapsulating the moment it curls and breaks.
  2. resin art serene beach scene
    Serene Beachfront - A tranquil beach scene with gentle waves lapping onto golden sands, evoking a sense of calm.
  3. epoxy resin coral reef seascape
    Deep Sea Wonders - An exploration of underwater depths, showcasing vibrant coral reefs and marine life.
  4. resin art ocean sunset
    Sunset Over the Horizon - Capturing the fiery hues of a sunset as it dips below the ocean's expanse.
  5. aerial view seascape resin art
    Coastal Aerial View - A bird's-eye view of the coastline, highlighting the interplay between land and sea.
  6. nautical epoxy resin art
    Maritime Adventure - Featuring sailboats or ships braving the vast, open waters, perfect for the nautical enthusiast.
  7. moonlit ocean resin art
    Mystical Moonlit Tide - The enchanting glow of the moon reflecting off the rippling ocean surface at night.
  8. surfing wave resin art
    Surfer's Paradise - An action-packed scene with a surfer riding a beautifully sculpted wave, ideal for lovers of the sport.
  9. resin art hidden cove seascape
    Hidden Cove - A secluded spot where the sea meets the shore, surrounded by cliffs and foliage.
  10. stormy sea epoxy art
    Stormy Seas - The dramatic energy of an ocean storm, with dark skies and tumultuous waves.

If you're ready to dive deeper into this oceanic adventure or explore other realms within epoxy resin artistry, check out our comprehensive guides on making everything from geode art pieces to miniature ponds:

Your journey through epoxy resin art doesn't end here; it's just beginning. As you experiment with different techniques and materials, remember that every mistake is a stepping stone to mastery. Embrace each challenge as an opportunity to refine your skills and push creative boundaries further than ever before!

Seascape Creation: Your Epoxy Resin Art Checklist

  • Gather all necessary materials, including epoxy resin, hardener, pigments, mixing cups, and stirring sticks🛒
  • Ensure you have protective gear such as gloves, masks, and safety glasses🧤
  • Prepare your workspace by covering it with plastic sheets or newspapers to prevent spills📰
  • Select a high-quality, non-yellowing epoxy resin for best results🔍
  • Measure the resin and hardener accurately according to the manufacturer's instructions🥄
  • Mix the resin and hardener thoroughly to ensure a proper cure🌀
  • Add pigments or dyes gradually, mixing well to achieve the desired oceanic colors🎨
  • Pour the resin into your mold or onto your surface carefully to avoid air bubbles🌊
  • Use a heat gun or torch to remove any air bubbles that may have formed🔥
  • Layer additional colored resin to create depth and movement reminiscent of the sea🌈
  • Incorporate elements such as sand or shells for added texture and realism🐚
  • Allow the resin to cure fully, following the time guidelines provided by the resin manufacturer
  • Once cured, remove the piece from the mold if applicable
  • Sand any rough edges or surfaces for a smooth finish🪵
  • Polish the seascape piece to a high shine, if desired
  • Mount or frame your artwork for display, if necessary🖼️
Congrats, you've successfully created a stunning epoxy resin seascape! Display it proudly and let the oceanic vibes flow.
Oliver Stone
Sculpting, Resin Crafts, Outdoor Activities, Woodworking

Oliver Stone is a professional sculptor who specializes in resin. He has a deep understanding of the material's properties and potential, and enjoys sharing his knowledge and experience with the Style Resin community. Oliver's articles are a treasure trove of tips, tricks, and techniques for working with resin.

Post a comment

0 comments